The whole system which connected computers by cables or wireless communication is called network.
Almost Linux systems are used by connecting networks. Physical networks often use twisted-pair cables for connecting computers. As wireless network is spreading today, there are cable and wireless mixed network in many places.
9.1.1 Local Area Network and Wide Area Network
There are mainly two types of networks. Local Area Network(LAN) is the closed network such as inside a school or inside a house. Wide Area Network(WAN) is more long distance network, and its typical one is the internet.
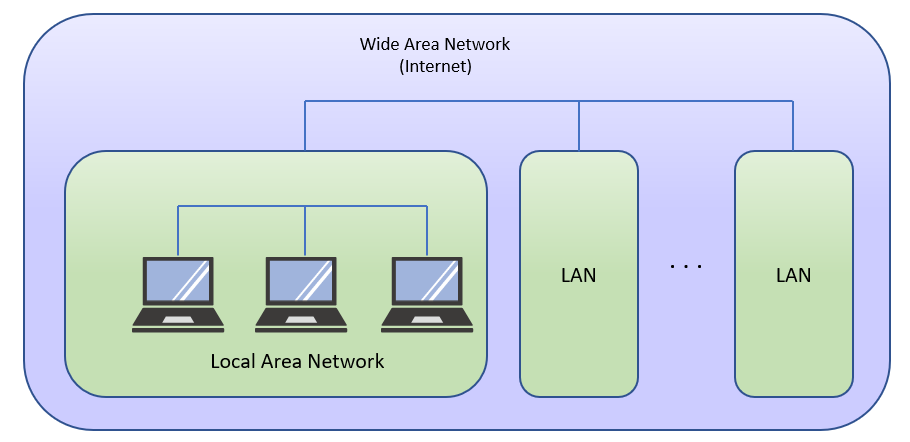
Figure 9-1:Local Area Network and Wide Area Network
9.1.2 IP
Between computers in network, data is transmitted and received by defined procedures(protocol). The
network of the Ethernet standard generally used today uses TCP/IP as the protocol. IP (Internet Protocol) of TCP/IP is the foundation of the procedure. IP is a simple mechanism of sending the packet which consists of destination and data. The ping command, which sends data to equipments such as servers or routers, can be used for checking whether the return message for confirmation was sent back or not.
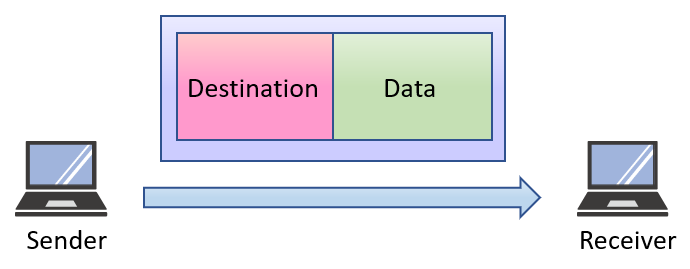
Figure 9-1:Local Area Network and Wide Area Network
It sends data to a target (host name or IP address), and displays the response time.
Practice : Check the IP address of a local machine |
$ ping 192.168.1.1 ↵ ping sent data to 192.168.1.1
PING 192.168.1.1 (192.168.1.1) 56(84) bytes of data.
64 bytes from 192.168.1.1: icmp_seq=1 ttl=30 time=1.01 ms Responded in 1.01ms
64 bytes from 192.168.1.1: icmp_seq=2 ttl=30 time=0.914 ms Responded in 0.914ms
Terminated by [Ctrl]C
--- 192.168.1.1 ping statistics ---
2 packets transmitted, 2 received, 0% packet loss, time 1002ms
rtt min/avg/max/mdev = 0.914/0.966/1.018/0.052 ms
|
Practice : Check the networked machine |
Please check lpi server's answer and its response time by using ping command.
$ ping lpi.org ↵ ping sent data to lpi.org
PING lpi.org (24.215.7.162) 56(84) bytes of data.
64 bytes from clark.lpi.org (24.215.7.162): icmp_seq=1 ttl=46 time=115 ms Responded in 115ms
64 bytes from clark.lpi.org (24.215.7.162): icmp_seq=2 ttl=46 time=100 ms Responded in 100ms
Terminated by [Ctrl]C
--- lpi.org ping statistics ---
2 packets transmitted, 2 received, 0% packet loss, time 1001ms
rtt min/avg/max/mdev = 100.817/108.391/115.965/7.574 ms
|
ping command terminates by entering Ctrl-C. Some computers don't respond ping's protocol, because of
security.
9.1.3 TCP and UDP
TCP (Transmission Control Protocol) is the procedure of sending data using the mechanism of IP (Internet Protocol). IP is the basic network procedure(protocol) for internet as described above. The TCP checks errors such as breakage of data. When an error occurred, the TCP requests resending of data. There is UDP (User Datagram Protocol) as same level of other protocol. Since UDP does not check transmission error and resend data, it can send data at high speed. It is suitable for image applications which require speed than reliability.
9.1.4 IP address
If we want to transmit data, we have to have both addresses of sender and receiver. On the Internet, there are two address spaces called IPv4 (Internet Protocol version 4) and IPv6. Address space of IPv4 consists of 4 bytes numeric. In general, since every byte is expressed by decimal number, the address is expressed by 4 pieces of decimal numbers. There are global IP address and local IP address. Because the global addresses are officially managed by internet community, we can not use it without permission.
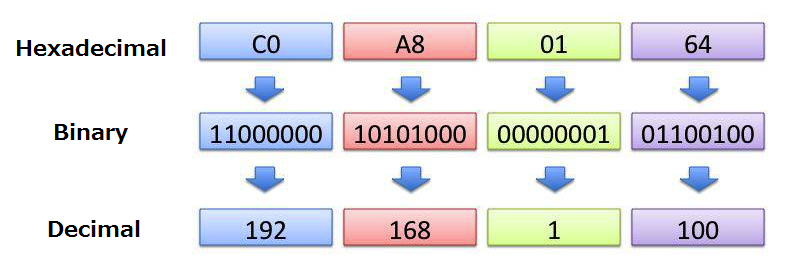
Figure 9-3:IP Address
9.1.5 Class of IP address
IP address of IPv4 consists of network address and host address. The network address is where the subnet mask bit is on(like 255 in Table 9.1), and the host address is where the subnet mask is off(like 0 in Table 9.1).
Generally, addresses are assigned continuously to the organizations, like a school or a company. The IP address is classified by the length of the network address. Today the community is classifying IP addresses into one of the A,B,C. The community has been reserving D and E class which are not used now.
Regarding host address, if the address is 0, it is the address of the network itself. If all bits of host address are on, the address is called the broadcast address They both have special roles, so we can't assign them to the real equipment.
| Address Range |
Subnet Mask |
Class |
Number of IP Address |
| 0.0.0.0 - 127.255.255.255 |
255.0.0.0 |
Class A |
563(16777216) |
| 128.0.0.0 - 191.255.255.255 |
255.255.0.0 |
Class B |
2562(65536) |
| 192.0.0.0 - 223.255.255.255 |
255.255.255.0 |
Class C |
256 |
| 224.0.0.0 - 239.255.255.255 |
|
Class D |
| 240.0.0.0 - 255.255.255.255 |
|
Class E |
Table 9-1:IP Address Classes
9.1.6 Private IP address
The IP address which can be used freely is prepared in the local network, and it is called private IP address. Private IP address is as follows.
| Address Area |
Subnet mask |
Class |
| 10.0.0.0 -10.255.255.255 |
255.0.0.0 |
Class A |
| 172.16.0.0 - 172.31.255.255 |
255.255.0.0 |
Class B |
| 192.168.0.0 - 192.168.255.255 |
255.255.255.0 |
Class C |
Table 9-2:Private IP Address
9.1.7 Subnet Mask
There is a limit of the number of computers connectable in same local network, which was calculated by the efficiency of data transfer. In order not to put many IP addresses on the same network, it is possible to restrict the number of host address by managing subnet address and host address separately. To specify subnet address, we use the value of a subnet mask. The network can be divided into a large number of networks, by using subnet mask.
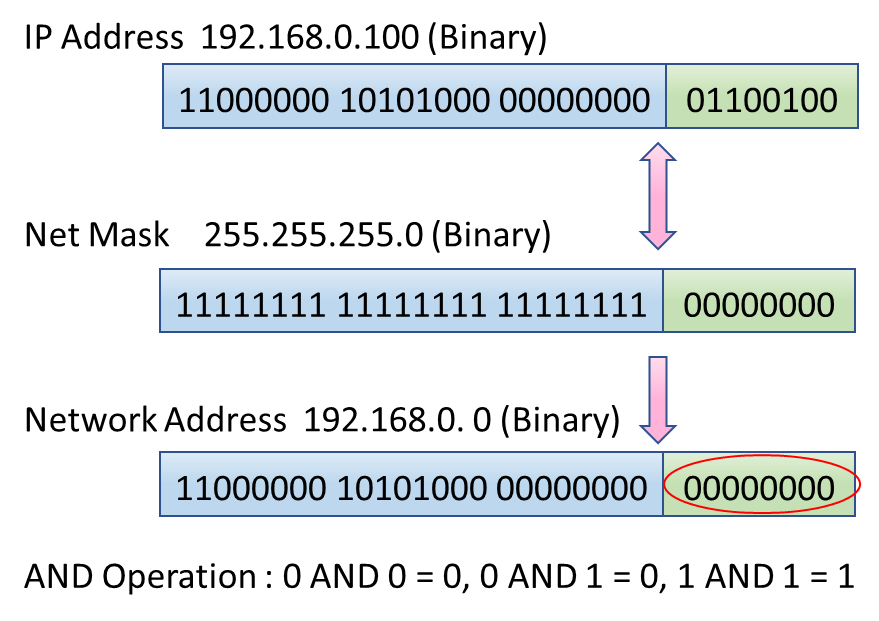
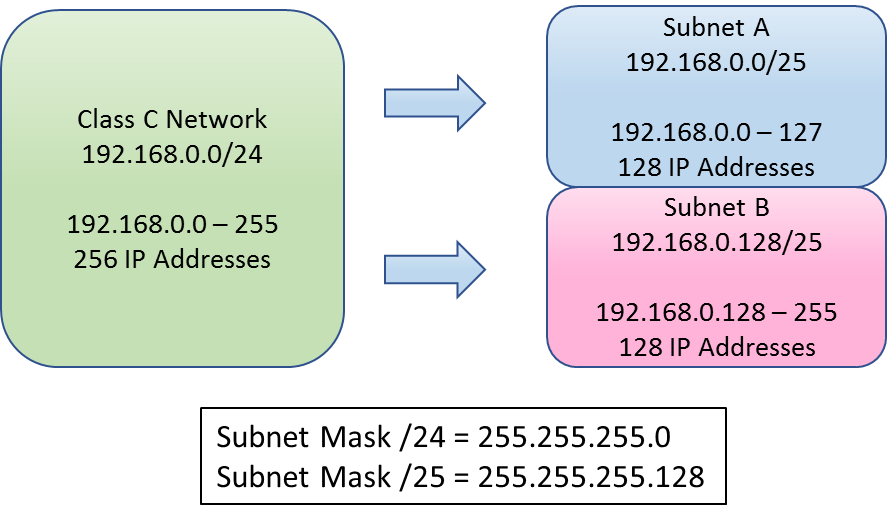
Figure 9-4:Subnet Mask
9.1.8 Checking Network Routing
When we connect a LAN to other LAN or WAN, we put an equipment between them, which is called gateway.
A gateway passes network data to the next network, as shown in the next figure.
The Internet is configured by connecting many networks. Many networks are relaying the data to destination. A number of gateways exist on the way, and the data are transmitted and received through those gateways.
There is traceroute command, which shows you all gateways which relay the data from your computer to the target computer.
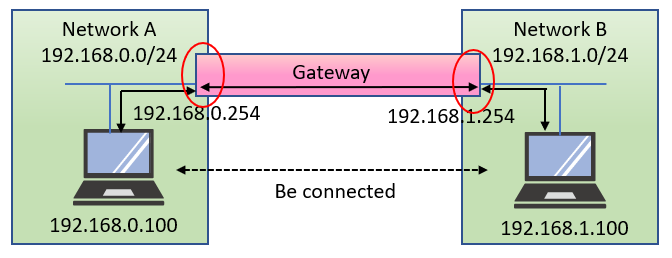
Figure 9-5:Gateway
This command sends data to a target or an intermediate gateway, and display the time which gateways
sent back.
Practice : Check gateways by traceroute command |
Please check whether there are any answers from gateways on the way to lpi.org server by using traceroute command.
$ traceroute lpi.org ↵ Check route to lpi.org
traceroute: Warning: lpi.org has multiple addresses; using 24.215.XXX.XXX
traceroute to lpi.org (24.215.XXX.XXX), 30 hops max, 38 byte packets In maximum, 30 gateways can be
displayed
1 inetgw (218.YYY.YYY.YYY) 0.162 ms 0.211 ms 0.219 ms It took 0.219ms to 218.YYY.YYY.YYY
2 218.219.ZZZ.ZZZ (218.219.ZZZ.ZZ) 3.888 ms 3.056 ms 3.235 ms It took 3.235ms to 218.219.ZZZ.ZZZ
:
:
:
22 lpic.lpi.org (24.215.XXX.XXX) 160.688 ms 159.798 ms 161.246 ms It took 161.246ms to lpic.lpi.org
|
Some gateways don't respond to traceroute command because of security.
9.1.9 Network Interface
A network interface is required in order to access to the network.
There is a Network Interface Card (NIC) as a physical network interface. Today, in many cases, the network interface is integrated to one control chip.
There is a loopback interface as a logical network interface which a program uses internally.
9.1.10 Check IP address
The current setup can be checked by the ifconfig command.
The IP address and subnet mask which were set for the network interface are displayed.
If you omit interfaces (lo, eth0, etc.), you can see all interfaces' information.
Practice : Check the IP address of network interfaces |
$ /sbin/ifconfig ↵ Display the information of network interfaces
eth0 Link encap:Ethernet HWaddr 00:0C:29:EB:5D:C6 First network interface(eth0)
inet addr:192.168.1.60 Bcast:192.168.1.255 Mask:255.255.255.0
IP address is 192.168.1.60, and Subnet mask is 255.255.255.0
inet6 addr: fe80::20c:29ff:feeb:5dc6/64 Scope:Link
UP BROADCAST RUNNING MULTICAST MTU:1500 Metric:1
RX packets:11432 errors:0 dropped:0 overruns:0 frame:0
TX packets:8705 errors:0 dropped:0 overruns:0 carrier:0
collisions:0 txqueuelen:1000
RX bytes:2169853 (2.0 MiB) TX bytes:1097164 (1.0 MiB)
Interrupt:185 Base address:0x1400
lo Link encap:Local Loopback Loop back interface
inet addr:127.0.0.1 Mask:255.0.0.0 IP address is 127.0.0.1
inet6 addr: ::1/128 Scope:Host Subnet mask is 255.0.0.0
UP LOOPBACK RUNNING MTU:16436 Metric:1
RX packets:2385 errors:0 dropped:0 overruns:0 frame:0
TX packets:2385 errors:0 dropped:0 overruns:0 carrier:0
collisions:0 txqueuelen:0
RX bytes:4014756 (3.8 MiB) TX bytes:4014756 (3.8 MiB)
|
There are two network interfaces displayed by the ifconfig command. lo is a loopback interface, and eth0 is a physical network interface. The loopback interface is mainly used for checking network function from software point of view, such as a loopback test which sends and receives data internally.
9.1.11 IP address Configuration File (RedHat Linux)
Regarding RedHat Linux distribution, the IP address setup information is described in two files. The network is set up using two configuration files at the boot time.
A /etc/sysconfig/network-scripts/ifcfg-XXX configuration file describes its IP address, subnet mask, etc. of XXX interface.
In case of the loopback interface, lo is assigned instead of XXX. In case of network interface card,
ethN(N=0,1,...) is assigned instead of XXX.
The main contents of the /etc/sysconfig/network-scripts/ifcfg-XXX configuration file are as follows.
| ONBOOT |
At boot time, set address automatically(yes), or not(no) |
| DEVICE |
Network interface |
| HWADDR |
MAC Address |
Table 9-3: ifcfg-XXX` Entry(1)
BOOTPROTO describes how network address is set. 'static' means the address is static, and is set by using following configuration information. 'dhcp' means the address is dynamically assigned at boot time. 'dhcp' requires DHCP environment.
| IPADDR |
IP Address |
| NETMASK |
Subnet mask |
| NETWORK |
Network |
Table 9-4: ifcfg-XXX Entry(2) (For static)
The /etc/sysconfig/network configuration file describes the address and host name of the gateway by which data is transmitted to other networks.>
The main contents of the /etc/sysconfig/network configuration file are as follows.>
| NETWORKING |
Network is valid(yes), or invalid(no) |
| HOSTNAME |
Host name |
| GATEWAY |
Gateway |
Table 9-5: network Entry
By distribution, the contents of two configuration files have differences slightly.
Practice : Check the network interfaces |
Let's display the contents of configuration file by cat command.
$ cat /etc/sysconfig/network-scripts/ifcfg-lo ↵ Display the contents of
configuration file
DEVICE=lo For loop back interface
IPADDR=127.0.0.1 IP Address
NETMASK=255.0.0.0 Subnet mask
NETWORK=127.0.0.0 Network
# If you're having problems with gated making 127.0.0.0/8 a martian,
# you can change this to something else (255.255.255.255, for example)
BROADCAST=127.255.255.255
ONBOOT=yes Set address at boot automatically
NAME=loopback Interface name
$ cat /etc/sysconfig/network-scripts/ifcfg-eth0 ↵ Display the contents of
configuration file
# Advanced Micro Devices [AMD] 79c970 [PCnet32 LANCE]
DEVICE=eth0 For eth0
BOOTPROTO=static
BROADCAST=192.168.1.255
HWADDR=00:0C:29:FB:5F:23
IPADDR=192.168.1.60 IP Address
NETMASK=255.255.255.0 Subnet mask
NETWORK=192.168.1.0 Network
ONBOOT=yes
$ cat /etc/sysconfig/network ↵ Display the contents of configuration
file
NETWORKING=yes Network is valid
NETWORKING_IPV6=no
HOSTNAME=localhost.localdomain Host name
GATEWAY=192.168.1.1 Gateway
|
Since MAC Address is the unique number for each hardware, you should not rewrite the number recognized automatically. Broadcasting is used for sending data to all equipment in the same network,
and it should be the last address of the network.
9.1.12 IP address Configuration File (Debian GNU/Linux)
Regarding Debian GNU/Linux distribution, the IP address setup information is described in
/etc/network/interfaces configuration file, and the network is set up using this file at the startup.
The main contents of the /etc/network/interfaces configuration file are as follows.
| iface |
Interface name, Network name, static/dhcp/loopback.
'static' means the address is static, and is set by using following
configuration information. |
| auto |
Interface name the address of which will be set automatically |
| address |
IP Address |
| network |
Network |
| netmask |
Subnet mask |
| gateway |
Gateway |
Table 9-6:Major contents of /etc/network/interfaces Configuration file
Practice : Check the network interfaces |
Let's display the contents of configuration file by cat command.
$ cat /etc/network/interfaces ↵ Display the contents of configuration
file
# This file describes the network interfaces available on your system
# and how to activate them. For more information, see interfaces(5).
# The loopback network interface
auto lo For loop back interface(lo)
iface lo inet loopback
# The primary network interface
#allow-hotplug eth0
#iface eth0 inet dhcp
iface eth0 inet static For eth0
address 192.168.1.61 IP Address
network 192.168.1.0 Network
netmask 255.255.255.0 Subnet mask
broadcast 192.168.1.255
gateway 192.168.1.1 Gateway
auto eth0
|
9.1.13 Interface Setup
If you want to change network interface, you modify the configuration file and run /etc/init.d/network script with restart option. The script is usually performed when Linux starts up or shuts down with other options.
Practice : Reconfigure network interface |
Let's display the network setup before restarting a /etc/init.d/network script.
# ifconfig eth0 ↵ Display the setup of eth0
eth0 Link encap:Ethernet HWaddr 00:0C:29:FB:5F:23
inet addr:192.168.1.60 Bcast:192.168.1.255 Mask:255.255.255.0
inet6 addr: fe80::20c:29ff:fefb:5f23/64 Scope:Link
UP BROADCAST RUNNING MULTICAST MTU:1500 Metric:1
RX packets:73136 errors:0 dropped:0 overruns:0 frame:0
TX packets:46269 errors:0 dropped:0 overruns:0 carrier:0
collisions:0 txqueuelen:1000
RX bytes:15664826 (14.9 MiB) TX bytes:7723381 (7.3 MiB)
Interrupt:185 Base address:0x1400
# vi /etc/sysconfig/network-scripts/ifcfg-eth0 ↵ Change the setup
# /etc/init.d/network restart ↵ Reconfigure the network
interface
Shutting down interface eth0: [ OK ]
Shutting down loopback interface [ OK ]
Bringing up loopback interface: [ OK ]
Bringing up interface eth0 : [ OK ]
# ifconfig eth0 ↵ Display the setup of eth0
eth0 Link encap:Ethernet HWaddr 00:0C:29:FB:5F:23
inet addr:192.168.1.70 Bcast:192.168.1.255 Mask:255.255.255.0
inet6 addr: fe80::20c:29ff:fefb:5f23/64 Scope:Link
UP BROADCAST RUNNING MULTICAST MTU:1500 Metric:1
RX packets:73136 errors:0 dropped:0 overruns:0 frame:0
TX packets:46269 errors:0 dropped:0 overruns:0 carrier:0
collisions:0 txqueuelen:1000
RX bytes:15664826 (14.9 MiB) TX bytes:7723381 (7.3 MiB)
Interrupt:185 Base address:0x1400
|
If the stop option is attached to the /etc/init.d/network script, all network interfaces will become invalid, and if the start option is attached, all invalid network interface will become validated.
9.1.14 Checking Network Routes
There is the netstat command for displaying the network situation. We can investigate the direction (routing) of data flows by using the netstat command.
Display the network situation
-r
Routing (data flow to gateways) of a computer is displayed.
-n
IP addresses are displayed as numerical value.
|
This command displays the route of the current network.
Practice :Check the current routing and interface |
$ netstat -nr ↵ Display routing table
Kernel IP routing table
Destination Gateway Genmask Flags MSS Window irtt Iface
192.168.1.0 0.0.0.0 255.255.255.0 U 0 0 0 eth0
169.254.0.0 0.0.0.0 255.255.0.0 U 0 0 0 eth0
127.0.0.0 0.0.0.0 255.0.0.0 U 0 0 0 lo
0.0.0.0 192.168.1.1 0.0.0.0 UG 0 0 0 eth0
|
According to this result, all the data goes to 0.0.0.0 and the data of 0.0.0.0 goes to 192.168.1.1.
If 192.168.1.1 is a gateway, data will be transmitted to outside from this network.
9.1.15 Changing Network Routes
The route command is used in order to change the current route setting. Administrator authority is required for execution of the route command.
When it performs without option, the routes information of the network are almost same as the result of having performed netstat -nr.
route add [-net|-host] target [netmask subnet_mask] [interface] |
By using route command with add option, you can add another route. Regarding target address, when
using -net, you specify network address, and when using -host, you specify host address. When
specification of subnet mask is omitted, the proper mask value for class of target address, will be applied.
If the interface is omitted, the kernel will take the optimal device automatically.
Let's add a route to the network 192.168.2.0 of Class C.
# route add -net 192.168.2.0 netmask 255.255.255.0 eth0 ↵ Add route
# route ↵ Display routes
Kernel IP routing table
Destination Gateway Genmask Flags Metric Ref Use Iface
192.168.2.0 * 255.255.255.0 U 0 0 0 eth0
192.168.1.0 * 255.255.255.0 U 0 0 0 eth0
169.254.0.0 * 255.255.0.0 U 0 0 0 eth0
127.0.0.1 * 255.0.0.0 U 0 0 0 eth0
|
route add default gw target [interface] |
If you specify default gw, it adds the default gateway, which is the gateway used when any appropriate routes can not be found.
Practice : Add default gateway |
Let’s Add 192.168.1.1 as default gateway.
# route add default gw 192.168.1.1 eth0 ↵ Add default gateway
# route ↵ Display routes
Kernel IP routing table
Destination Gateway Genmask Flags Metric Ref Use Iface
192.168.2.0 * 255.255.255.0 U 0 0 0 eth0
192.168.1.0 * 255.255.255.0 U 0 0 0 eth0
169.254.0.0 * 255.255.0.0 U 0 0 0 eth0
127.0.0.1 * 255.0.0.0 U 0 0 0 eth0
default 192.168.1.1 0.0.0.0 UG 0 0 0 eth0
|
In the above-mentioned example, since there is only one interface, all data are transmitted to outside through 192.168.1.1.
route del [-net|-host] target [netmask subnet_mask] [interface] |
If you specify del option, you can delete specified route.
Practice : Delete a route |
Let's delete the route to the network 192.168.2.0 of Class C.
# route del -net 192.168.2.0 netmask 255.255.255.0 eth0 ↵ Delete route
# route ↵ Display routes
Kernel IP routing table
Destination Gateway Genmask Flags Metric Ref Use Iface
192.168.1.0 * 255.255.255.0 U 0 0 0 eth0
169.254.0.0 * 255.255.0.0 U 0 0 0 eth0
127.0.0.1 * 255.0.0.0 U 0 0 0 eth0
default 192.168.1.1 0.0.0.0 UG 0 0 0 eth0
|
9.1.16 Setup by using DNS
If you want to use name service for finding the addresses of each node, you specify what kind of services you want to use in /etc/nsswitch.conf.
In the /etc/nsswitch.conf file, file(files) and DNS(dns) are specified for 'hosts'. When specifying files, the system looks at the /etc/hosts. When specifying dns(DNS:Domain Name Service), the system looks at the /etc/resolv.conf and uses DNS servers.
The priorities of items written for 'hosts' are the order described.
/etc/resolv.conf file can specify three nameservers as DNS server, and it asks in order the following server in case not getting response.
nameserver 192.168.1.1
nameserver 192.168.1.2
nameserver 192.168.1.3
|
The /etc/hosts file is the file which defines host name and its IP address statically. The definition is written one definition by one line as follows.
IP Address Name(FQDN) host_name
Example
127.0.0.1 localhost.localdomain localhost
192.168.1.50 test.lpi.or.jp test
|
9.1.17 Name(FQDN)
In case of using IP addresses only, it is difficult for us to memorize and handle them. Because of that, we can also use the name(example: www.lpi.or.jp) which is called FQDN (Fully Qualified Domain Name). Strictly speaking, the relationship between IP address and FQDN is not 1 to 1. But we can find just only one address from FQDN. We can find the relationship between IP address and name by using the nslookup command.
The name and IP address of the target are returned.
Practice : Inquire the host name by IP address |
$ nslookup 24.215.7.162 ↵ nsInquire the host name whose address is
24.215.7.162
Server: 192.168.1.1
Address: 192.168.1.1#53
Non-authoritative answer:
162.7.215.24.in-addr.arpa name = clark.lpi.org. IP Address which responds to FQDN
Authoritative answers can be found from:
$ nslookup lpi.org ↵ Inquire IP address of lpi.org
Server: 192.168.1.1
Address: 192.168.1.1#53
Non-authoritative answer:
Name: lpi.org
Address: 24.215.7.162 FQDN which responds to IP Address
|
9.1.18 Port Number
When communicating by TCP/IP, we have to use a port number for each service in addition to the IP address.
What port number each services use is already defined. The port numbers for general service are already written in /etc/services file.
| Name |
Range |
Contents |
| WELL KNOWN PORT NUMBERS |
0~1023 |
General port number |
| REGISTERED PORT NUMBERS |
1024~49151 |
Registered port number |
| DYNAMIC AND/OR PRIVATE PORTS |
49152~65535 |
Freely usable port number |
Table 9-7:Port Number and its Service
9.1.19 Confirm services
| Port Number |
Service Name |
| 20 |
FTP(Data) |
| 21 |
FTP(Control) |
| 22 |
SSH |
| 23 |
Telnet |
| 25 |
SMTP(Mail) |
| 53 |
DNS |
| 80 |
HTTP(Web) |
| 443 |
HTTPS(encrypted Web) |
Table 9-8:Well used Port Number and its Service
Linux has been used as an OS suitable for servers. The programs run in servers provide service mainly. For example, an web server provides web service, which shows some homepages.
The services from Linux are almost provided through network. The netstat command which displays the network situation can also investigate and display the service provided.
- Displaying the network situation
The current network situation is displayed. We use this for the display of service.
-a
All the services are displayed.
-t
TCP service is displayed.
-u
UDP service is displayed.
|
If you use -t or -u option, only the service connected now is displayed. If you add -a option to that, service of a standby state can also be displayed.
Practice : Display provided TCP services |
$ netstat -at ↵ Display all TCP services
Active Internet connections (w/o servers)
Proto Recv-Q Send-Q Local Address Foreign Address State
tcp 1 0 192.168.1.60:39671 ns1.centos.org:http CLOSE_WAIT # Waiting
tcp 1 0 192.168.1.60:39673 ns1.centos.org:http CLOSE_WAIT # Waiting
tcp 1 0 192.168.1.60:39675 ns1.centos.org:http CLOSE_WAIT # Waiting
tcp 1 0 192.168.1.60:58609 centos.at.multacom.com:http CLOSE_WAIT # Communicating
tcp 0 0 ::ffff:192.168.1.70:ssh ::ffff:192.168:nicetec-mgmt ESTABLISHED # Communicating
|
Practice : Display provided UDP service |
Please perform the netstat command with -a and -u options.
$ netstat -au ↵ Display all UDP services
Active Internet connections (servers and established)
Proto Recv-Q Send-Q Local Address Foreign Address State
udp 0 0 *:filenet-tms *:* # Waiting
udp 0 0 *:722 *:* # Waiting
udp 0 0 *:725 *:* # Waiting
udp 0 0 *:mdns *:* # Waiting
udp 0 0 *:sunrpc *:* # Waiting
udp 0 0 *:ipp *:* # Waiting
udp 0 0 *:filenet-rpc *:* # Waiting
udp 0 0 *:mdns *:* # Waiting
|
9.1.20 Network Security Setup
The function called TCP Wrapper is provided for network security. If you want to use TCP wrapper for
strengthening security, the service has to use the library (program) which offers a TCP wrapper function. It is also necessary to prepare the /etc/hosts.deny file which restricts access, and the /etc/hosts.allow file which permits access.
In these two control files, there are program list and client list separated by ':'. The program list indicates programs that are providing targeted services. The client list indicates targeted networks, ip addresses, host names and domain names. The services in /etc/hosts.deny will be denied, and the services in /etc/hosts.allow will be permitted. After client name, you can specify a shell script which runs when described condition is satisfied. If you want to describe all services or all clients, you can use 'ALL' statement. A control file is described as follows.
Program list : Client list [:Shell Script]
Example
/etc/hosts.allow
sshd : 192.168.1.60
/etc/hosts.deny
ALL : ALL
|
The setup becomes effective only after describing in these two control files.
If you describe allowing services in /etc/hosts.allow after making all the accesses denyed by the
/etc/hosts.deny file, it's safer way.
9.1.21 Firewall Setup
There is the firewall function which can control network communication for each port of TCP/IP. The
firewall is set up using a command called iptables.
Administrator authority is required for this operation.
Practice : Display the firewall setup |
If you use -L option, you can check the current firewall setup.
# iptables -L ↵ Display the firewall setup
Chain INPUT (policy ACCEPT)
target prot opt source destination
RH-Firewall-1-INPUT all -- anywhere anywhere
Chain FORWARD (policy ACCEPT)
target prot opt source destination
RH-Firewall-1-INPUT all -- anywhere anywhere
Chain OUTPUT (policy ACCEPT)
target prot opt source destination
Chain RH-Firewall-1-INPUT (2 references)
target prot opt source destination
ACCEPT all -- anywhere anywhere
:
:
ACCEPT tcp -- anywhere anywhere state NEW tcp dpt:ssh
REJECT all -- anywhere anywhere reject-with icmp-host-prohibited
|
Since some distributions suppress almost all services in default, if you want to use some services, you have to change the firewall setup. Although you can set individually by the iptables command, those will be cleared when rebooted. The distribution of Red Hat software Linux system describes the setup of iptables to /etc/sysconfig/iptables, and it is set up at the time of starting of service.
Practice : Change the firewall setting |
As an example, let's add Apache service to a firewall in CentOS 5. Apache service assumes that the default port number (80) is used. The following one line is added to /etc/sysconfig/iptables.
-A RH-Firewall-1-INPUT -m state --state NEW -m tcp -p tcp --dport 80 -j ACCEPT
|
As default setting, the permitted services are described first. Since there is reject statement at the last line, all services which are not written in this file are refused. Therefore, it is necessary to describe the service to add before the line of reject statement.
# vi /etc/sysconfig/iptables ↵
:
:
-A RH-Firewall-1-INPUT -m state --state NEW -m tcp -p tcp --dport 22 -j ACCEPT
-A RH-Firewall-1-INPUT -m state --state NEW -m tcp -p tcp --dport 80 -j ACCEPT
-A RH-Firewall-1-INPUT -j REJECT --reject-with icmp-host-prohibited
COMMIT
|
After modification, let's reboot.
# /etc/init.d/iptables restart ↵
Applying firewall rules: [ OK ]
Setting chains to policy ACCEPT : filter [ OK ]
Iptables : Unloading modules; [ OK ]
iptables : Applying firewall rules: [ OK ]
iptables : Loading additional modules: ip_conntrack_netbios_ns [ OK ]
# iptables -L ↵ Display the firewall setting after reboot
:
:
ACCEPT tcp -- anywhere anywhere state NEW tcp dpt:ssh
ACCEPT tcp -- anywhere anywhere state NEW tcp dpt:http
Please check whether Apache service was added
REJECT all -- anywhere anywhere reject-with icmp-host-prohibited
|